Tagged: baby quilts Toggle Comment Threads | Keyboard Shortcuts

  • Jill C. 4:00 pm on March 23, 2009 Permalink | Reply
    Tags: baby quilts, , , , offset frame   

    Quilt Patterns by Doris: Offset Frame 

    Finished size 42″ square.  Download as a word document here offsetframe

    The center squares are a good place to use large scale novelty prints. This is called the focus fabric.

    Cut strips across the full width of 44″ fabric. Kit contents:
    Color number 1 – focus fabric: One whole and one half strip 6-1/2 inches wide for centers. Four 2 1/2 ” strips for the borders.
    Color number 2 – first frame: Three and a half strips 2-1/2 inches wide
    Color number 3 – second frame: 4 strips 2-1/2 inches wide
    Color number 4 – sashing: 7 strips 2-1/2 inches wide


    Sew on two borders: Measure width of quilt. Pin top and bottom borders to quilt, right sides together with quilt, short edges extending a bit beyond quilt. Sew with a 1/4″ seam, then trim ends to match the width of the quilt.
    Sew the next two borders: Repeat with two more strips.

    Making the quilt sandwich: Press the fabric to be used for the quilt back. Lay out a piece of batting the required size (should be 44″ square) on a flat surface.
    Place the pressed piece of backing fabric RIGHT SIDE UP on top of the batting.
    Place the completed, pressed top WRONG SIDE UP on top of backing. RIGHT SIDES TOGETHER!
    Smooth the wrinkles and center the top on the batting and backing. The top will be slightly smaller. Make sure the backing and batting are the same size or a bit larger than the top. Pin around the edges, through all the layers.
    Starting on any edge and about one third in from any corner, sew 1/4″ from the raw edge of top around all four sides, leaving an opening of about 10″. Start with backstitching, pivot at each corner, and end with backstitching. Trim seams and clip corners. Turn carefully to right side, pulling corners as square as possible. Press lightly and stitch opening shut by hand or machine. Topstitch around the outer edges to make the quilt more durable. Use a decorative stitch if you wish.
    Tying the quilt: Use all 6 strands of embroidery floss threaded through a needle. From the top of the quilt, push the needle through and back up 1/4″ away. Pull the thread, leaving about 4″. Wrap the threads in the right hand not once but twice around the other thread. Pull tightly. Tie again, wrapping the left thread two times around right. Repeat this in a pattern over the whole quilt. Every 3″ to 4″ is good coverage. Trim floss ends to 1/2″ to 1/4″.
    OR machine quilt.

    Your Offset Frame kids quilt is done!

     
  • Jill C. 3:46 pm on March 22, 2009 Permalink | Reply
    Tags: baby quilts, , , , rail fence   

    Quilt Patterns by Doris: Rail Fence 

    Finished size about 42″ x 42″. Four colors in 100% cotton. Download as a word document here railfence easy quilt pattern by Doris

    There are four colors in this simple to make quilt. One of the fabrics will also be used for the backing. Three fabrics are used to make the “rails” and the fourth is used for the border. You can use a fifth color for the backing if you wish. OR you can make it with three colors by using one of the rail colors as the border. Adjust yardage accordingly. Instructions are written for using four colors.

    Color number 1 Borders and Back: 2 yards
    Color number 2 : 1/2 yard
    Color number 3 : 1/2 yard
    Color number 4 : 1/2 yard

    Cutting guide for 42″ size using 44″ wide cotton. Wash fabric, iron, fold selvages together, press. Cut strips across the full width of the fabric. Kit contents:

    Always launder fabric before using. This removes any sizing or other chemicals and pre-shrinks the fabric. Use a mild detergent and no fabric softener. Cut with rotary cutter and mat to the measurements as shown above. Decide which colors will go where and the order for the rails. Keep in mind that the outside colors will form the rails. Set aside the backing square and the border fabric strips. Press seams towards darker fabric, or press seams open, whichever is easier for you.


    Borders: Pin top and bottom borders to quilt, right sides together with quilt, short edges extending a bit beyond quilt. Sew with a 1/4″ seam, then trim ends to match the width of the quilt. Repeat with two more strips on sides.
    Making the sandwich: Press the fabric to be used for the quilt back. Lay out a piece of batting the required size (should be 44″ square) on a flat surface. Place the pressed piece of backing fabric RIGHT SIDE UP on top of the batting. Place the completed, pressed top WRONG SIDE UP on top of backing. RIGHT SIDES TOGETHER!
    Smooth the wrinkles and center the top on the batting and backing. The top will be slightly smaller. Make sure the backing and batting are the same size or a bit larger than the top. Pin around the edges, through all the layers.
    Starting on any edge and about one third in from any corner, sew 1/4″ from the raw edge of top around all four sides, leaving an opening of about 10″. Start with backstitching, pivot at each corner, and end with backstitching. Trim seams and clip corners. Turn carefully to right side, pulling corners as square as possible. Press lightly and stitch opening shut by hand or machine. Topstitch around the outer edges to make the quilt more durable. Use a decorative stitch if you wish.
    Tying the quilt: Use all 6 strands of embroidery floss threaded through a needle. From the top of the quilt, push the needle through and back up 1/4″ away. Pull the thread, leaving about 4″. Wrap the threads in the right hand not once but twice around the other thread. Pull tightly. Tie again, wrapping the left thread two times around right. Repeat this in a pattern over the whole quilt. Every 3″ to 4″ is good coverage. Trim floss ends to 1/2″ to 1/4″. OR machine quilt.

     
  • Jill C. 5:12 pm on March 7, 2008 Permalink | Reply
    Tags: baby quilts, , , , snail trail   

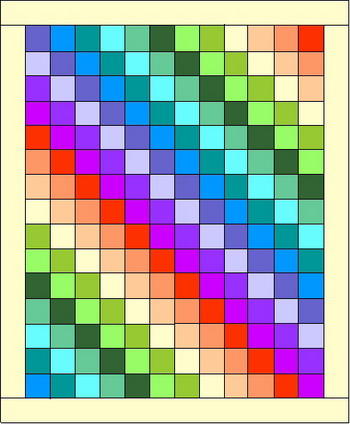
    Snail Trail Quilt Pattern by Doris 

    42” x 51”
    Snail Trail Kid’s Quilt by Doris

    Border: 5 – 3 ½” strips
    Color 1, 2, 3, 4, 5, and so on: This quilt needs a total of 15 – 3 ½” strips to make the pattern. It can be in as many colors as you wish. It is a great way to use up odd strips. You should use at least 5 and as many as 15 different fabrics. Spend some time deciding how they will be arranged.

    STEP ONE

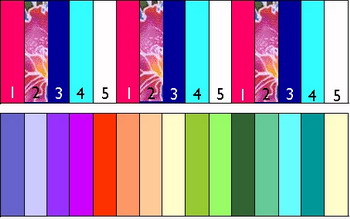
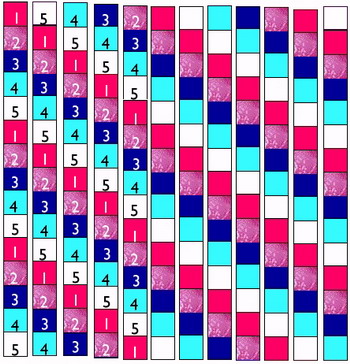
    In the drawing below, an equal number of strips and colors (5 strips in 5 colors) are laid out in a repeating pattern. In the lower drawing an odd assortment is laid out to balance the colors. Move them around until you are satisfied. When you are happy with the arrangement, sew the strips together with consistent ¼” seams. Press the seams alternately to one side then the other.step 1

    STEP TWO
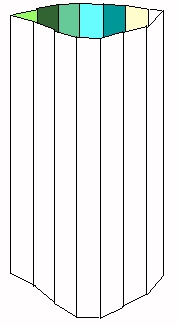
    Take this very large strip set and fold it right side in, the long way in half, bringing the raw edges together. Sew this seam, turning the strip set into a tube. Lay the tube on the cutting mat.step 2 tube

    STEP THREE
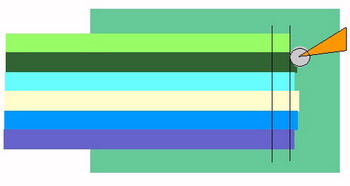
    Smooth it out and make a clean cut across one end, evening out all the strips. Slice across at 3 ½”. You should get 12 slices. They will be in rings.step 2 cutting mat

    STEP FOUR – EQUAL COLORS
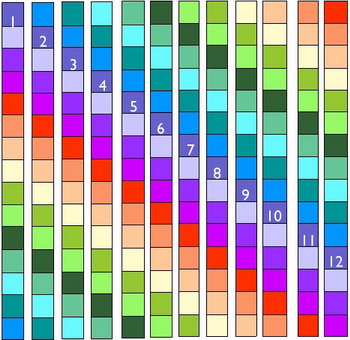
    In the case of equal colors it doesn’t matter where you start unpicking the seams. Unpick the seams between any #5 color and #1 color. Next between a #1 and #2. Then # 2 and #3, #3 and #4, and #4 and #5. Repeat until they are all in strips and lay them out to make the pattern as shown.equal colors

    UNEQUAL COLORS
    Choose a color to run diagonally from the top left corner. Unpick the seam that connects it to the next square. Lay this out flat so that your chosen color is first across the top. On the next ring, making sure the order stays the same, unpick the stitches to make this color second. Each ring should move this color one spot down as shown.unequal colors

    STEP FIVE
    From here on it doesn’t matter if the strips are odd or not. After you have all the strips laid out to form the pattern, sew the rows together aligning the seams. Press.
    STEP SIX – BORDERS
    Cut one border strip in half. Add one half strip to each of two other border strips for side borders. Pin side borders to quilt, right sides together with quilt, short edges extending a bit beyond quilt. Sew with a 1/4″ seam, then trim ends to match the length of the quilt. Sew remaining two strips on top and bottom of quilt. Trim ends to match the width of the quilt.
    STEP SEVEN – MAKING THE SANDWICH
    Press the fabric to be used for the quilt back. Lay out a piece of batting the required size on a flat surface. Place the pressed piece of backing fabric RIGHT SIDE UP on top of the batting. Place the completed, pressed top WRONG SIDE UP on top of backing. RIGHT SIDES TOGETHER!
    Smooth the wrinkles and center the top on the batting and backing. The top will be slightly smaller. Make sure the backing and batting are the same size or a bit larger than the top. Pin around the edges, through all the layers.
    Starting on any edge and about one third in from any corner, sew 1/4″ from the raw edge of top around all four sides, leaving an opening of about 10″. Start with backstitching, pivot at each corner, and end with backstitching. Trim seams and clip corners. Turn carefully to right side, pulling corners as square as possible. Press lightly and stitch opening shut by hand or machine. Topstitch around the outer edges to make the quilt more durable. Use a decorative stitch if you wish.
    Tying the quilt: Use all 6 strands of embroidery floss threaded through a needle. From the top of the quilt, push the needle through and back up 1/4″ away. Pull the thread, leaving about 4″. Wrap the threads in the right hand not once but twice around the other thread. Pull tightly. Tie again, wrapping the left thread two times around right. Repeat this in a pattern over the whole quilt. Every 4″ is good coverage. Trim floss ends to 1/2″ to 1/4″.
    Your Snail Trail quilt is done!

     
    • Jill C. 9:21 am on November 11, 2015 Permalink | Reply

      Cut strips 3 1/2 by width of fabric (42″ or more). There will be selvages at both ends, and all the strips won’t be equal. They are evened up in step 3 by trimming off one end of the strip set. Tip: since the seams are long, if you sew all in the same direction it could make a twisty strip set. Sew alternately up one seam, and down the next.

      Like

    • Sue Clement 12:01 am on November 11, 2015 Permalink | Reply

      How long should the strips be cut? Are they 3 1/2 by ?

      Like

c
Compose new post
j
Next post/Next comment
k
Previous post/Previous comment
r
Reply
e
Edit
o
Show/Hide comments
t
Go to top
l
Go to login
h
Show/Hide help
shift + esc
Cancel